Fence posts may seem like a straightforward topic; after all, they simply support a fence panel at set locations. In essence, a post does one job: it supports the fence. However, there are often wider considerations in fencing, such as "Should I dig my post into the ground?" or "I can't excavate here, should I bolt my post down instead?" Sometimes, questions about strength arise: "Is this post actually strong enough to support this height of fence?" In our experience, one of the most underutilised post options is the cranked post. In this blog, we’ll take a closer look at exactly what a cranked post is and break down some of the uncertainties surrounding them.
Understanding Post Types
To begin, it's essential to understand the different post-installation methods, specifically the differences between installation types:
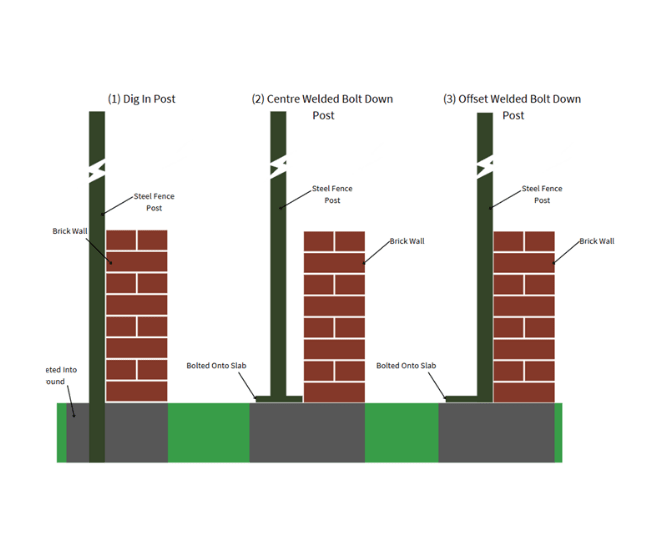
(1) Dig-In Post: A dig-in post is where [TS1] excavation is required to insert a portion of the post into the ground, and is typically[TS2] secured with concrete. For example, a 1.8m high system means 1.8m above the ground, with the post generally [TS3] being 2[CM4] .5m, leaving 700mm of the post buried. This can vary depending on factors such as wind loading, crowd loading, infill weight, ground conditions, and gradient.
(2) Centre Welded Bolt-Down Post: In this method, a 1.8m fence height would use a 1.8m post welded to a base plate at the centre. This is the standard style for most bolt-down systems. Note that the actual post length is often slightly shorter than the fence height, as the thickness of the base plate is taken into account. The post is then bolted to solid ground using ground screws, resin, or other mechanical fixing methods suited to the substrate.
(3) Offset Welded Bolt-Down Post: In this setup, the post is welded to the edge, making it ideal for gapless systems. This is particularly useful when bolting next to walls or plinths and can often be required for end posts. Again, the post length is slightly shorter than the fence height due to the base plate thickness. The post is then bolted to solid ground with appropriate fixing methods.
(4) Flanged Straight Post: This post is mechanically fixed through the face of a wall or plinth, using lugs or cleats that are welded to either side of the post in multiple locations, helping to spread the load.
(5) Flanged Straight Post Dig-In: For additional stability, when the ground conditions are too granular, a post can be flanged for added strength from the supported wall.
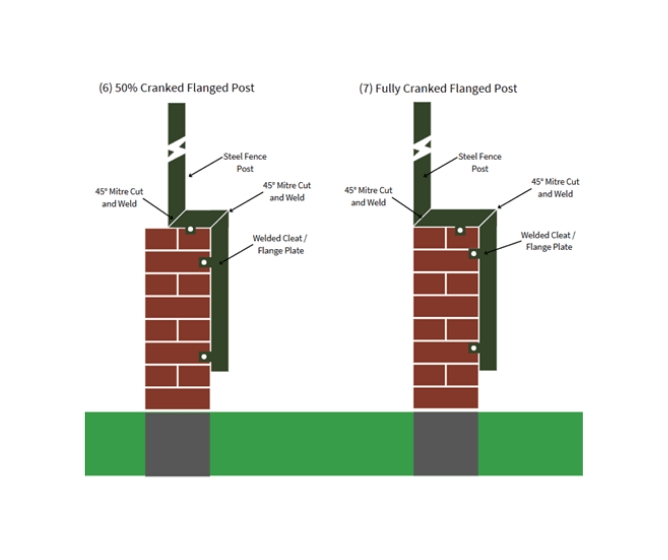
(6) 50% Cranked Flanged Post: This type is used when the fence line[TS5] needs to run 50% of the depth of the wall. It is achieved by cutting the post with two 45-degree mitre cuts, welding them together to create a "dog leg". This post is often flanged in two directions, through the face of the wall and from above, providing additional strength. The vertical post for mounting the fence can be set to any distance, but a common standard is 50% of the depth of a brick wall.
(7) Fully Cranked Flanged Post: This is used to prevent potential climbing issues on a wall ledge. [TS6] The fence line can hang completely in line with the edge of the wall or plinth. This is achieved by cutting the post with two 45-degree mitre cuts and welding them together to form a "dog leg." Like the 50% cranked post, it is often flanged in two directions, through the face of the wall and from above, for added strength.
A Closer Look at Cranked Posts
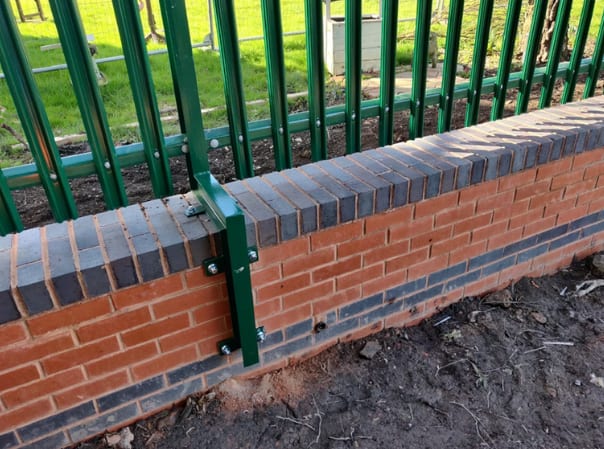
Now that we understand the basic differences between post styles, let’s take a closer look at cranked posts. The key element is the flange plates, which can be welded onto either side of an RSJ, Square Hollow Section (SHS), or Rectangular Hollow Section (RHS) post. Typically made from a 5mm thick steel plate for 1.8m to 3.0m height systems, a post will usually feature between four and six mounting locations.
Installation involves drilling the correct number of holes in the same locations as the holes in the flange plates and then securing the post in place with resin and studding. The studding is tightened with a washer and nut to ensure a firm fit. It's not recommended to use shear nuts, as these typically shear at between 17 and 21kN of force. Instead, a non-security nut that can tighten to a higher torque is recommended, offering a more secure post and reducing the likelihood of wobbling.
Each cranked post has been made to last, made from high quality powder coated steel, making them ideal for installation in outdoor locations. Cranked fencing posts are an ideal choice for increasing security in locations that may already have low brick walls, such as around parks, sports areas or commercial sites.
Examples of cranked flanged posts:
Conclusion
It’s important to note that not every wall, slab, plinth, or site is the same, meaning that a custom drawing is often required to ensure the load is evenly distributed, depending on the material being bolted to.
Our cranked posts are available for speedy UK delivery for standard sizes, please see the product pages or contact us for more information.
First Fence offers a comprehensive bespoke drawing service, tailoring the design of cranked posts to meet your specific site requirements. For more information on custom post drawings, contact 01283 512 111 or email sales@firstfence.co.uk, where one of our friendly sales advisors will guide you through the custom post process, step by step.